The world of business intelligence is ever evolving, and security is an integral aspect of it. Row Level Security, commonly known as RLS, is a vital feature in Microsoft’s Power BI that should be utilized to ensure data safety. Today, we’ll demystify RLS, explore its importance, and learn how to implement it in Power BI.
Grasping the Concept of Row Level Security (RLS)
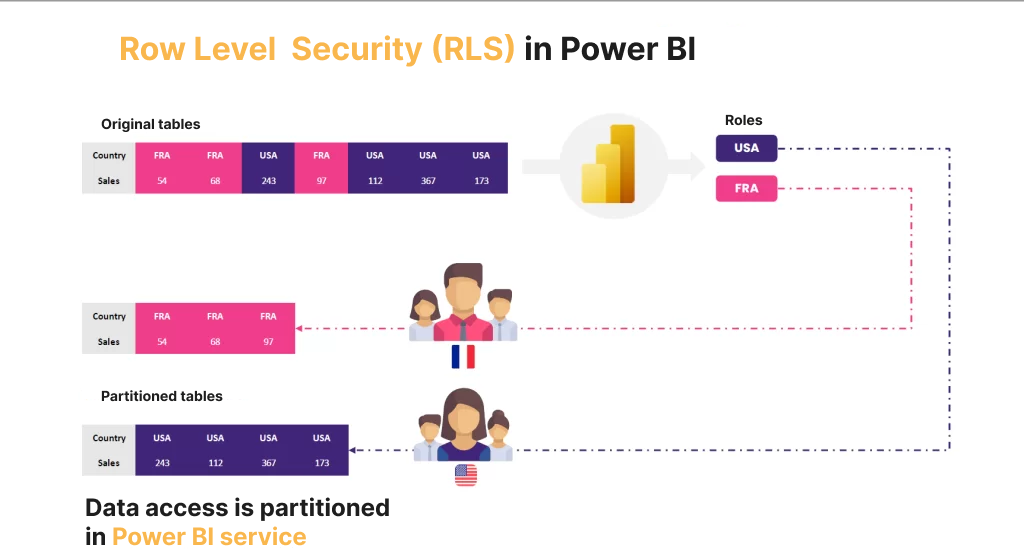
In the simplest terms, RLS is a mechanism that restricts data access at the row level based on user roles. Essentially, RLS controls which users can access which data within a given report or dashboard in Power BI.
Why is Row Level Security Necessary?
In the current digital era, data is often regarded as the new oil, and its security is paramount. The need for RLS can be summed up into the following critical points:
1. User-Specific Data View: RLS enables each user to see only the data relevant to them. This ensures that users are not overwhelmed with information and can make faster, more informed decisions.
2. Enhanced Data Security: RLS adds an extra layer of data protection by restricting users to access only the rows of data they need for their work, minimizing the risk of sensitive information getting into the wrong hands.
3. Regulatory Compliance: For businesses that handle sensitive data, meeting regulatory compliance standards is a must. RLS helps adhere to such regulations by implementing stringent data access controls.
Steps to Implement RLS in Power BI
Implementing RLS in Power BI involves a systematic process, from creating a user table to assigning roles.
Creating a User Table: The first step to implement RLS in Power BI is to create a user table. This table should ideally contain all the users who need to access the Power BI reports and dashboards. Ensure that each user is associated with the specific data they need to view.
For example, in a sales organization, your user table might contain each sales representative’s name and the regions they’re responsible for. Import this user table into your Power BI data model.
Defining Relationships: With the user table in place, define relationships between this table and other tables in your model. Using the sales organization example, you might create a relationship between the ‘Sales Rep’ field in your user table and the ‘Sales Rep’ field in your sales data table.
Creating Roles: Once your user table is linked appropriately, you can create roles. In Power BI Desktop, navigate to the “Modeling” tab, and select “Manage Roles.” In the new window, you can create roles based on your needs.
Let’s say you’re creating a role for ‘Sales Rep’. Under the role, select the user table and write a DAX formula to filter the data for each user. A common DAX formula used in this context is USERNAME(), which returns the username of the user viewing the report. For example, [Sales Rep] = USERNAME(). This formula restricts each sales representative from viewing only the data associated with their username.
Assigning Roles to Users: After creating and defining roles, publish your report to Power BI Service. Navigate to the workspace where you published the report, select “More options (…)” next to the dataset, and then “Security”. Here, you can add the users’ email addresses to their respective roles.
Testing Role Configurations: Testing your RLS setup is crucial to ensure it’s working correctly. Power BI provides a feature called “View as Roles” under the “Modeling” tab. This feature allows you to see the report as a specific role and verify that the data is filtered appropriately.
Remember, when applying RLS, the filters are applied in the backend, meaning that the user is unaware of the data they do not have access to, reinforcing the security of your data.
As we delve deeper into the age of data, the importance of features like Row Level Security in Power BI only continues to escalate. Use RLS effectively to ensure that your data remains secure, and your insights remain sharp.